Sunday, July 28, 2024

In a few more days, my cotton plants will be one year old. They are growing quite wildly now among with the weeds. The coming of the rainy season has freshen them up. There are no signs of the aphids, the red cotton stainers, and the weavils, that infested them during the summer. The once dead leaves caused by aphids were replaced with lush green leaves. I think the viny weeds have helped them stood up against the wind during the recent storm that hit us. So i will not be weeding them yet as we will be expecting a few more storms to come. There are also lots of cotton bolls, probably a lot more compared during the summer. However, the rain is severely damaging the bolls, much more than insect damage. The bolls often rot away. I am contemplating of putting a clear roof over them to keep the rain out...


Saturday, June 5, 2021

Brief Updates

Hello. I think years have passed since my last post. A lot has happened. First of all, around early 2020, the Covid-19 pandemic has swept throughout most of the planet and more than a million have already died.  Some megacorps have already released some vaccines but we have yet to see its efficacy in combating the virus.  Meanwhile, many countries including the Philippines still implement some sort of lockdowns or quarantine.  People are required to wear face masks in public places.  Large social gatherings are not allowed.  The Dungeoners have not had any meetings since the lockdowns started. Well, limited public transportation can also be attributed to that.  I try not to get out of the house unless necessary, like when i need to go to the hardware to buy parts for my project. Anyways, the covid virus i think will be part of our lives for years to come. I can not do anything about it. Just need to be careful not to contract it.  Treatment will be difficult as most of the hospitals are full. Ok, enough of the covid for now and let us move on to my craft activities.

I told myself before that I would stop at cotton spinning.  Well, after several visits to the H.A.B.I. Fair and the National Museum, and a one week weaving workshop at PTRI, I have finished constructing my very own working floor loom from scrap lumber lying around the house. 


Besides the loom, I also had to build some tools necessary for weaving.  There is no local stores I can buy them from.  Instead of hiring someone, i thought i should learn to make them myself.


For my first real weaving project, i decided to make myself a pair of handwoven-handsewn pants.  I was pretty much inspired by the book "Sew Your Own Pants" by John-Paul Flintoff.  Reading about the sweatshops and slavery going about in the clothing industry  made up my mind to finally take up weaving, and eventually handsewing.  It is not perfect, but i think my pants turned out good.


Pretty much, weaving is my main focus right now.  Hopefully I can inspire others to take the craft themselves and consider slow fashion.  For now, I will stop here.  I will do my best to update at least once a week and revive this blog.  If you are interested in any of my post, please drop a comment below.  

Stay safe everyone!

Saturday, December 30, 2017

I have come full circle...


I am trying to figure out a new packaging for my oblique pen holders. I still make my own packaging so I need something that is easier to make, uses less material, but still provides considerable protection and aesthetically pleasing. I am currently using a traditional box with sliding cover but it takes too much time to make. I tried a pillow box before, but it is too soft in the middle so I reverted back to the rectangular box. I thought I would try a triangular shape this time, like a Tobleron box, but it must have a self-locking mechanism like a pillow box so it can hold it´s shape without using glue or tape. The design should be simple that I will not need to cut complicated shape or slots. Something that can work with a rectangular sheet of cardboard and incorporate a series of folds like an origami.


This brings back memories of college days. This is the kind of exercises we actually did. I guess I have come full circle. I love making things, studying the process, the materials. Maybe I should stick to this permanently? It may not be as grandiose as my dreams before, working in a big design firm, designing high-tech consumer products. Who knows, maybe if I stick to this long enough, I can eventually make a big difference.


Sunday, December 24, 2017

From Fiber to Socks...

I finally finished my lace toe-up-socks project.  It took quite some time.  I am a slow knitter, but with this one, I also carded the raw cotton fiber and spun all the yarn using the drop spindle and charkha which I also constructed.  Though, I could really use some help with my bind-off.  Anyways, I did not have enough yarn when I started the project, so I carded, spun, and knitted as the project progresses.  Thus, you might notice the three tones.  The change in color tone indicates where I ran out of yarn.  I dyed the yarn before spinning. I used avocado skin to make the natural dye.  I really like the color.  I did not use any mordant to really bind the dye to the fiber.  But I think I read somewhere that I do not need to use a mordant since I am using a natural dye on a plant fiber.  I just boiled the skin from one avocado and when the water was quite dark, I soaked my yarn for about two hours and hung it to dry overnight.  


My cotton spinning has become finer, particularly when I used the charkha.  Learning to spin at consistent thickness will probably take quite some time to master.   I initially built a spinning wheel with a treadle, but it was not working smoothly, and I really needed more yarn, so I decided to make a charkha, and work my technology from the ground up.  The charkha was really easy to construct and use.  I can actually make a long draw with only one hand, which I can not do with my spinning wheel.  Probably because I can not properly adjust the feed of the spool.  Since I will be working mostly with cotton fiber, I will stick with the charkha for a while.  The high speed charkha is ideal with spinning fine cotton thread or yarn.


Merry Christmas Everyone!!!
Peace on Earth, Goodwill toward Men.


Wednesday, April 5, 2017

New flyer and bobbin, tiny carders, natural cotton fiber...


I am working on new flyer and bobbin assembly for my spinning wheel.  This time, I will be using a  6mm steel rod for the axle instead of wood. I made a new bobbin to fit the new axle.  Initially, I tried to use old CDs for the bobbin ends but abandoned the idea because I thought it will take more time to make.  So, I ended up turning the ends on my lathe again.  For now, I stayed with the PVC for the bobbin core, but in the future, I will probably make bobbins entirely of wood as I can now turn faster with my new gouging chisels and the tool rest I hacked.


For the orifice, I am suppose to use a PVC pipe but ended up using a steel rod instead, only because I wanted to practice on my metal turning.  It took me more than half a day to bore a hole through the rod.  I will definitely use wood in the future.  I am trying a new flyer configuration where the whorl is mounted near the orifice.  And since I also want to use double treadle with two arms to spin the wheel, I guess I will have to rework the spinning wheel entirely.


Meanwhile, I am back to using a drop spindle.  I made a new one. This time a top whorl spindle.  I turned a two inch diameter disc for the whorl and used a cheap 6mm bamboo knitting needle for the spindle.  I decided to use the entire length of the needle, about 14 inches.  That way, I can still use the needle for knitting if I need it again.  The extra length gives me plenty of room to hold and it seems to reduce wobbling when I spin.


As for the cotton, I am now using natural cotton fiber.  A few weeks ago, I was fortunate to attend a free seminar on cotton production sponsored by H.A.B.I. The guest speaker was Dr. Edison C. Rinen,  Regional Director of the Philippine Fiber Industry Development Authority.  At the seminar, I met someone from the the textile industry who was willing to sell me some cotton fiber.  Two days after, I was at their factory to pick up the cotton I ordered.  Shipping the cotton via LBC cost several times more than the cost of the cotton.  The staff at Nooks was very kind to offer me a tour of their facility.  I naturally accepted!  


I also found some tiny cotton carders at a local mall and bought a pair to try them out. Exactly what Phreadde Davis suggested in his blog Spindlicity.  They are not actually carders but combs for cats, but they are made of the same material.  So this finally solved my cotton preparation problem.  With the carder and natural cotton fiber, I can now make better punis.  In fact, the more time I spend preparing the cotton, the easier it is to draft.  I can now spin faster and the yarn thickness is more consistent now with less lump.


To summarize, if you are in the Phillipines and want to take up yarn spinning to complement your crochet and knitting, or even weaving, it is very much possible.  Like knitting, you do not need expensive tools or equipments.  With Php 500 or less, you can probably spin enough yarn to knit a cardigan.  We can buy carders at the mall or petshops.  For drop spindles, you can use an old knitting needle and CD discs.  For natural cotton fibers, though a bit short on supply, we can still buy some locally and not import anything.   H.A.B.I. and the Philippine Fiber Industry Davelopment Authority are doing their best to revive the cotton industry by encouraging farmers to plant cotton again.  If more people decides to spin yarn, demand for cotton will definitely increase and this will definitely help encourage our farmers to plant more cotton.

Wednesday, March 15, 2017

My First Skein...

I finished plying my single yarn and wound it around the niddy-noddy I made out of a pvc pipe I scavenged around the house.  I bought some cap ends and t-connector at a local hardware to assemble the niddy-noddy and make it look nicer.


The two-ply yarn made about 50 loops around the niddy-noddy and the loop was about 30 inches when stretched.  I spun about 3000 inches or 250 feet of 2-ply yarn (or 500 feet of single-ply yarn).


It weighs about 37 grams. I took some yarn and knitted a small swatch.  The yarn thickness is irregular and has lots of lumps, but after knitting several rows, I got the hang of it. So, it is possible to spin a roll of medical cotton into a yarn and knit it into something.


Next I boiled the yarn for few minutes in a soapy water and rinsed it afterwards. This is to permanently set the twist on the yarn.


After hanging the yarn to dry, I have my first skein of yarn!


What's next?  Well, I have found a source of natural cotton fiber.  I bought 2 kilos, which will probably last for a while.  I can not wait to spin them but i have to rework my spinning wheel, or probably even make a new one similar to our traditional wheel.


Thursday, January 19, 2017

My First Spinning Wheel...


Still feverish with the spinning bug that bit me, I have been spending the couple of days building my first spinning wheel, complete with flyer and bobbin assembly.  I based my wheel on the dodec design which can be found plenty on the internet.  I decided not to build the dodec wheel out of wood but instead, use a bicycle wheel to save time.  Except for the wheel, the screws and the nuts and bolts, most are recycled materials.  It took me some time to get it working.  I had to re-make the flyer whorl several times because the drive band keeps on slipping and the flyer will not turn.  I found out that for whorls, you use V-groove to get more traction while for bobbins, you use U-groove and should be very smooth to allow for the scotch tension to slip.  It seems to work now.  I can make minute adjustments on the scotch tension to control the rate the bobbin pulls and winds the yarn.  But the spinning wheel still needs a lot of work and tweaking.  I have to redo the treadle.  With the light and simple spindle assembly, the treadle works fine, but with the flyer and bobbin, the treadle will not work at all.  I have to crank the wheel with my hand. So far, all the problems I have encountered, can also be found on a good commercially produced spinning wheel, so I guess mine is ok for now.

But, even if I managed to perfect my wheel, still there is one factor I have not addressed.  Fiber preparation, particularly cotton.  I am still using medical cotton to test my wheel and it is very difficult to draft.  In the west, spinners use a special tool called carders to prepare fibers, or they can buy fibers in different forms like sliver, rover, roll logs, punis... these are ready for spinning.  However, we do not have these in our country.  We do have spinning traditions here in our country.  I believe, if I am not mistaken, it was in Ilocos where the masts of the great galleons of the west were weaved.  But, tabacco industry later became more profitable, and we lost the cotton industry.  I still have not found any reference as to how we traditionally prepare our cotton for weaving.  I am pretty sure we did not use carders.  But our traditional hand cranked spinning wheels were very much like the ones used in other asian countries, like in Laos.  In Laos, they use a simple tool similar to a bow, and they use the string part to beat a pile of cotton inside a basket until it is all fluffy.  Then with a long thin stick, they rolled the fluffy cotton tightly into a punis form similar to India.  Carders, I can not make, but a bow with a string, and a basket, that I can make.  Our ancestors probably use the same technique.  There are still a few weavers in Ilocos which still use the old method, maybe I should take a visit.

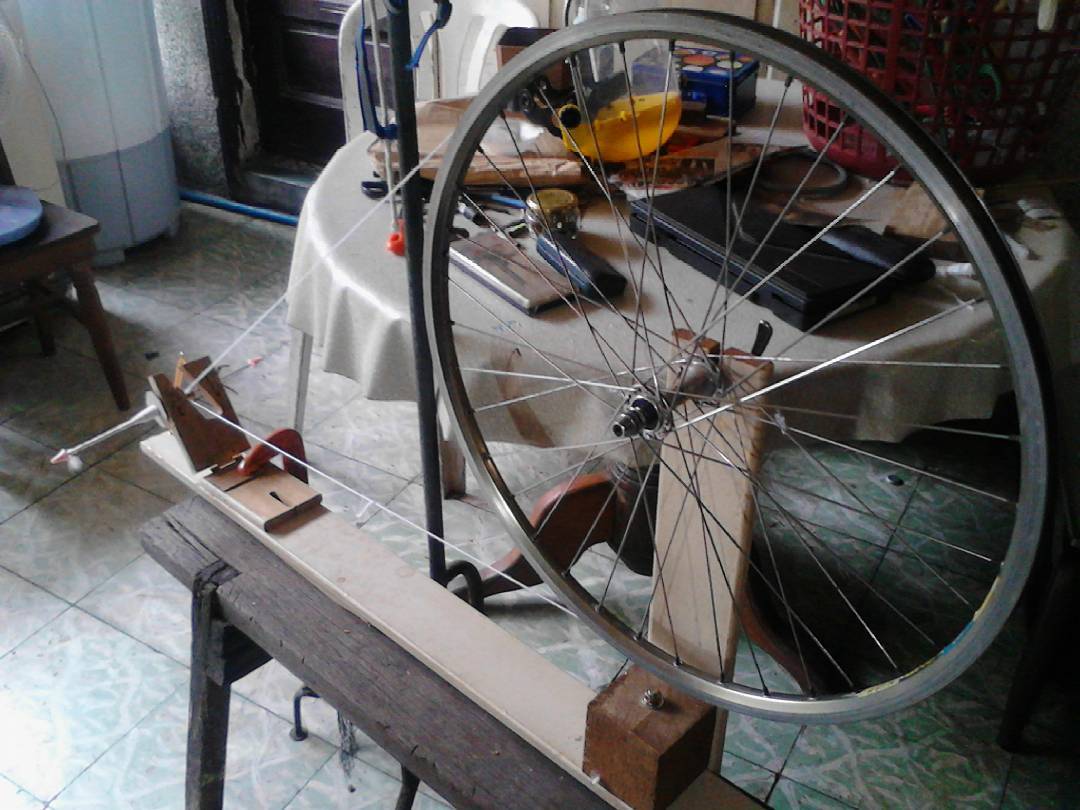
Flyer and bobbin assembly...


 B

Spindle attachment...


Sample one ply yarn...


Whorl groove.. and scotch tension...


Monday, December 26, 2016

The idea of spinning my own yarn has been bugging me for days.  Most of the yarns I used for knitting were imported and some of them were quite expensive.  Man has been hand spinning yarn since the ancient days so I know it is not impossible, plus, there are lots of how-to videos on youtube, which also means hand spinning yarn is not an obsolete technology.

So yesterday, with my old mini-lathe and a piece of 2-by-2 I pulled out from the firewood pile, I turned myself a dealgan, a whor-less drop spindle used by the people of the north... or the west... I am not sure.  Animal fiber is a bit difficult to find in our country, so I settled for something readily available as substitute, a 400-gram bag of cotton roll.  It was a bit frustrating at first, but I managed to get the hang of it in a few minutes.  I finally settled for a park-draft technique, where I spin the dealgan a few times, hold it between my knees, and while maintaining the tension of the yarn, draft the cotton a few millimeters at a time as it is taken up by the twist created by the spinning of the spindle.  Drafting was quite difficult as the cotton fiber is very short.  So I have plenty of bumps in my yarn.  But I am sure with some more practice, I can have the smoothest yarn possible for a drop spindle and a cotton fiber.  Maybe carding the cotton might help also, but right now, I am not sure how I should get one.  Carding boards go for $30 and up at Amazon!

Anyways, I think I was able to spin a couple of yards last night.  Probably not something a yarn hoarder would want in his stash, but it is definitely a yarn.  The dealgan is quite an amazing tool.  It fascinated me that all you need is a weighted stick to make a yarn or thread out of a fiber... imagine what a Spinning Wheel can do!


Tuesday, August 4, 2015

Homemade soap!

Trying to learn a new craft... soap making!  This was planted in my brain years ago when I saw a segment on "Japan Screen Topic" about a community that recycles used cooking oil from around the neighborhood and turned it into detergent soaps.  Working on bees finally pushed me to do it.  I was thinking of just doing the "melt and pour" soap making process but I overcame the fear of working with lye and decided to go for the "cold process".  I ordered my raw materials, just caustic soda and coconut oil, invited my buddies to come over the weekend so we can have our usual RPG session and make some "beauty soaps."  Nope! we did not pour lye on our hands ala "Fight Club!"  And we also did not use and human fats!

Forty-eight hours later, and the soap still won't come out clean from the silicon mold.  The soap is still soft and soggy especially at the bottom.  But the top is smooth and hard.


However, the moment the soap is exposed to air, it hardens.  Below, I gave the bottom part a little patting and smoothing so it will look a little bit OK.  I'll let the soap stay in the mold for a while.  I won't be able to do another batch until maybe next Sunday. Once I figure out the basics of soap making, I'll try to add my bee propolis extract!


Sunday, May 17, 2015

Stingless bees have started storing food in the eduction hive...


Twenty nine days into the eduction process, the bees have started storing food in the eduction hive. The bees have also sealed a great portion of the new hive box.  So, far I have not seen a queen.  I believe she will come later when the new hive is completely furnished.  Apis cerana, during the process of swarming, will leave the old hive without any idea where they will find a new home. Stingless bees on the other hand will look first for a new site and prepare it before their new queen moves in.


I also monitor the traffic going in and out of the eduction tube.  There will come a time when the main hive will cut off the connection to the eduction hive.  This is probably when a new queen starts laying eggs in the eduction hive, or when the main hive feels threatened. In such cases I will remove the tape covering the hole so the bees from the main hive will be able to forage outside.


Eduction method in progress...


What happened to the honey store?!?

I checked one of the hive yesterday and noticed the wax combs seem quite dry... the capped honey cells were missing and the nectar cells also disappeared.  The dish feeder was also dry...  Could it be that the bees have used up the little stored honey they had? That the honey flow is really over and supply can not keep with the bees demand? Rainy season is almost here.  What will my bees eat?  I got worried that my bees will abscond if they will not find any forage so, I returned this morning... and fed them sugar-water... sad... The queen cups I saw last time were still empty probably because of shortage of food.  I do not think they will push through with the reproductive swarm though.  So, I have to accept it, I am not going to get any harvest this summer.  Well, as long as my colonies will get stronger, I guess it is OK.


The bees were quite agitated again.  While inspecting the second hive, a bee decided to stick her sting through my thin jacket and got me in the arm.  I closed the hive and retreated back to the house but the bees were relentless and pursued me.  I moved in and out of the house to lure the bees out. When I thought I drove all the bees out, I removed my veil, but to my surprise, one bee managed to stay put inside.  It went berserk the moment I removed my veil.  I tried to flail my veil around hoping to drive the bee away but I think it only made her more angry.  It made a kamikaze attack directly at my face, which I failed to dodge. It got me near my left eye.  It was very close.  After that, I decided not to take any more photos and just finish putting sugar water in each hive as fast as I can so I can go home immediately before my left eye swell shut.  So far, not much swelling is happening and I hope it stay that way.  But based on my previous stings, the swelling really starts after a few days.


Anyway, I think the bees will be OK for now.  I don't think they will abscond.  I hope the feed will encourage them to stay put, forget about swarming, and start building brood combs on the lower chamber.  However, I still can not say that there are no food in the area.  As I observed each hive activity this morning, lots of bees were hauling loads of pollen.  The traffic was a steady stream.  I will check again in a week to see if they have started storing honey again.

I also found a few dead bees inside one of the chicken feeder I placed outside.  Which means, the bees were able to find the feeder.  I really do not like putting feeder inside the hive as it attracts hordes of ants.

Row of young larvae (center) surrounded by capped brood cells...


Wednesday, April 29, 2015

Giving Eduction Method Another Chance...


I just can not give eduction method a rest, so, I am at it again using one of the stingless bee colonies at CVSU.  I am not doing it step-by-step. I immediately connected an eduction hive to the main hive. I am hoping the stingless bees are as intelligent as the cerana bees in finding their way out and then back again, though I think it would be much of a challenge for them considering their size.  They have a long way to walk to reach the exit.


I was able to take a small piece of brood from the main hive and put it in the eduction hive. This is suppose to speed up the process.  Now I think I know why, or at least I know one reason.  If new bees are to emerge from the piece of brood I put, then, those bees will consider the eduction hive their real home and they will start working on it.  I don't think they will be going to the main hive.  There should be at least a hundred bees in that piece of brood.


It is actually Day 2 of the experiment, and I still have to see a clear indication that the bees are able to make their way back to the main hive.  The photo was taken this morning and there was very little activity going on.  Hopefully, this coming friday, I will be able to observe the bees the whole day so I can track the movement of some pollen carriers.

I put plastic sheets on top of the hives so now I can watch the bees without them flying out.  Here are some photos I took.

this is the eduction hive...


and these are photos of the main hive...


the brood...


pool of honey (upper right corner)


bees filling the honey pots (center)


a close-up of a stingless bee (Tetragonula biroi)... this guy is a little bit smaller than your regular house fly...